¶ Installation
¶ Initial config (keymaps etc)
-
Boot to ISO (downloaded from here)
-
Once booted, the first thing to do is to set the keymap correctly; the live environment will default to US keyboard layout. To change this, do the following:
- Run
ls /usr/share/kbd/keymaps/**/*.map.gzto list out available keymaps

You could use
grepto filter the result, e.g.ls /usr/share/kbd/keymaps/**/*.map.gz | grep ukwill show all results with exactly "uk" in it.- To set to UK layout, run
loadkeys uk
Note that there is no feedback that this was successful. You will only see an error message if the keymap you tried to load does not exist (
loadkeys: Unable to open file: <FILENAME>: No such file or directory). - Run
-
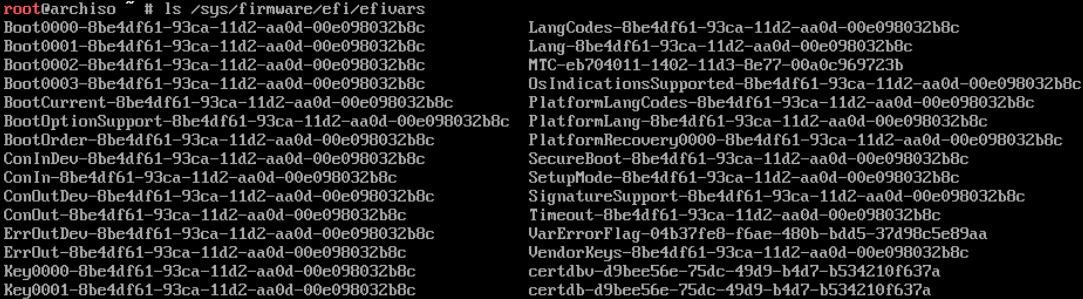
Check the boot mode:
ls /sys/firmware/efi/efivars. If this lists the contents of the directory with no errors, then the system is booted in UEFI mode.
-
Connect to internet. Verify connection using ping command
wired connections are set to acquire a network address via DHCP by default. Wireless connection will require some more work and you will need to use
iwctl.
- Verify the system time by running
timedatectl status(systemd-timesyncd is enabled by default)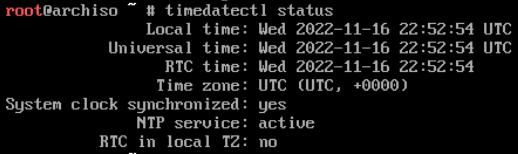
¶ Partition the disk
¶ Example partition layout
| Mount point | Partition | Type | Suggested Size |
|---|---|---|---|
/mnt/boot |
/dev/efi_system_partition |
EFI system partition | At least 300 MiB |
[SWAP] |
/dev/swap_partition |
Linux swap | More than 512 MiB |
/mnt |
/dev/root_partition |
Linux x86-64 root (/) | Remainder of the device |
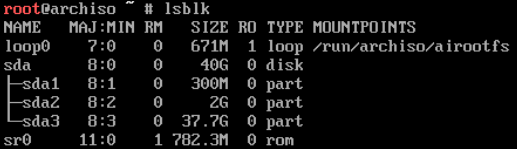
- Check what storage we have available by running
fdisk -l

orlsblkto identify disks

We're interested in/dev/sdaordisktype.loopandromcan be ignored.
Partitioning requirements:
- root directory (
/)- EFI partition for booting in UEFI mode.
If you wish to create LVM, encryption or RAID, do this here.
- Use
cfdiskto modify partition tables.
This assumes that a blank disk is being used
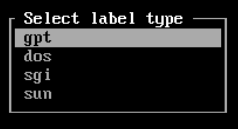
-
First select the partition type as
gpt
-
First partition to create is the boot partition. Select "New" and enter the size as "300M". After this the screen should looking something like this:

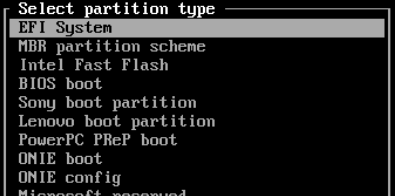
-
Next, select "Type" and set this to "EFI System" - should be top of the list of partition types.
-
Next we will create the swap partition (there are some arguments as to if this is needed any more or not, however we will create one here). Select the free space and then "New". Enter a size of greater than 512M - in this example I have used 2G.
-
Select "Type" and set to "Linux swap"
-
Partition the rest of the drive for root directory (
/). If you wish to get advanced, you could also partition it up for user home directories (/home) but we will keep it simple here. -
Now you should have something that looks like this:

-
Assuming all OK, now select "Write" to write the partition table information to the disk. Type "yes" and then select "Quit"
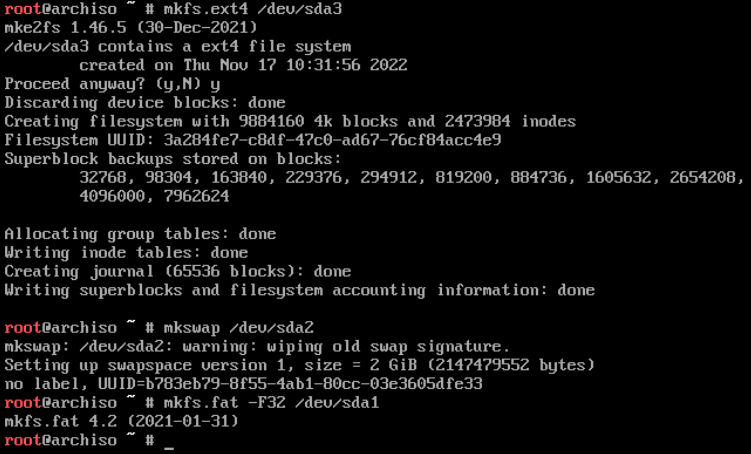
¶ Format the partitions
- Check the partitions and their identifiers. Again, you can use
fdisk -lorlsblk. The latter is my preference.
- Format the root partition
mkfs.ext4 /dev/sda3(in my example, yours may be different). Does not need to be ext4, can be whatever supported file system you like - If you created a swap partition, then format this:
mksawp /dev/sda2 - Format the EFI partition (this must be FAT32):
mkfs.fat -F32 /dev/sda1
In the end, it should look something like this:
¶ Mount the file system(s)
mount /dev/sda3 /mntmount --mkdir /dev/sda1 /mnt/boot/efi- If a swap partition was created,
swapon /dev/sda2
There will be no feedback in the case of a succesful mount operation
¶ Configure Mirrors
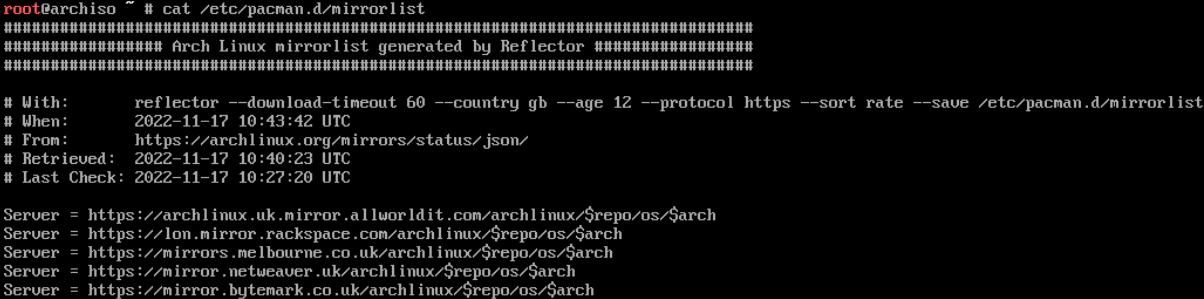
For this we will utilise reflector. This will allow us to check, sort and select mirrors.
The command I used here is:
reflector --download-timeout 60 --country gb --age 12 --protocol https --sort rate --save /etc/pacman.d/mirrorlist
This will
- ignore mirrors with a timeout longer than 60 seconds
- Select mirrors only in UK(gb)
- Select mirrors which were synchronised in the last 12 hours
- Select mirrors using the HTTPS protocol
- Sort mirrors by download rate
- Save the results to the pacman mirror list
If successful, this command will have no output. However you can verify that the file has been saved correct by running cat /etc/pacman.d/mirrorlist and you should see something like this:
Next, ensure that pacman is synchronised by running pacman -Sy. Once complete (should only take a matter of seconds, we are ready to start installing the base system.
¶ Install base system
The next stage is to install a base system. From a having a running, bootable system point of view, all packages that are required are:
- base
- linux
- linux-firmware
We need need to also specify where these packages are to be installed. We can do this using the "pacstrap" command. From the pacstrap man page:
pacstrap is designed to create a new system installation from scratch. The specified packages will be installed into a given directory after setting up some basic mountpoints. By default, the host system’s pacman signing keys and mirrorlist will be used to seed the chroot.
So, to set up a basic system run the following command:
pacstrap -K /mnt base linux linux-firmware
However, it is likely that you would want/need more functionality than this (for example the inclusion of a text editor, network management tools and so on). Instead of the command above, I would use:
pacstrap -K /mnt base base-devel linux linux-firmware vim sudo networkmanager man-db man-pages
If you think of something else after running this command, then you can easily add packages once 'chrooted' in to the base system.
We will coverchrootlater.
¶ Configuring the base system
Whilst the system has all the packages required to be booted in to, there are some missing configurations and settings that we should alter.
¶ fstab
We can generate the fstab (this file holds all the storage mount information for Linux based operating systems). In order to do this, run the following command:
genfstab -U /mnt >> /mnt/etc/fstab
The 'U' switch here defines the storage to be mounted by UUID rather than labels. I would recommend UUID as this is (in my experience) more robust than using labels.
Check the newly generated /mnt/etc/fstab file for errors, correcting as necessary:
cat /mnt/etc/fstab
¶ chroot
Next we will chroot (change root) in to the new system to carry out some further configuration such as setting timezone, locale etc.
arch-chroot /mnt

Note that the prompt changes.
¶ Time zone
Let us now set the time zone up using a symlink.
ln -sf /usr/share/zoneinfo/[REGION]/[CITY] /etc/localtime
So if you were in the UK, you would do
ln -sf /usr/share/zoneinfo/Europe/London /etc/localtime
¶ Localisation
Now we will configure the local language and keymap settings.
- Using editor of choice, edit
/etc/locale.genand uncomment required locales. For me, I will uncommenten_GB.UTF-8 UTF8
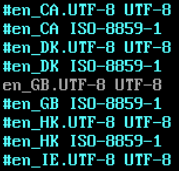
- Close and save changes
- Generate the locales information by running
locale-gen

- Create the file
/etc/locale.confand set theLANGvariable. In my caseLANG=en_GB.UTF-8 - If you changed the console with
loadkeysearlier, then make the change persist by creating the file/etc/vconsole.confand setting theKEYMAPvariable. In my caseKEYMAP=gb
¶ Network Configuration
- Create the
/etc/hostnamefile and add the hostname. - If desired you can also configure static IPs - however the system will obtain a DHCP address by default.
¶ Users and passwords
You can set a root password at this point using the passwd command. However I think that I would steer away from this and instead create a user with sudo priviledges.
- Create the user with the this command
useradd -m -G wheel leethax. This command will
- Create a user called
leethax - Add the user to the
wheelgroup (you'll see why later) - Create the users home directory (
/home/leethax)
- Set the new users password using
passwd leethaxand enter the password twice. - Next, allow users in the
wheelgroup to have sudo access. Runvisudoto edit the file and uncomment the line# %wheel ALL=(ALL) ALL
¶ Microcode
It is also a good idea to add in microcode. This is easy to do:
pacman -S amd-ucodefor AMD processorspacman -S intel-ucodefor Intel processors
¶ Bootloader
Now we could reboot here and the file system is basically ready to be used, however it will not boot. In order to boot it, we will need to add a boot loader which will take over from the system UEFI/BIOS and begin booting the OS (or allow you to chose between different installed OSes). In this case, we will use GRUB.
- Install GRUB and EFI boot manager:
pacman -S grub efibootmgr
Optionally also install
os-proberif you are installing alongside another OS
- Next, use
grub-installto install GRUB to the EFI partition (which we previously mounted to/boot/efi):grub-install --target=x86_64-efi --bootloader-id=grub

- Now we need to generate the configuration file for GRUB. Do this using
grub-mkconfig -o /boot/grub/grub.cfg
